
By designing a 3D printed adapter for your Milwaukee M12 battery, you can achieve this goal to adapt a Milwaukee M12 battery to the Makita CXT tool. The whole process is not difficult and we have outlined the details in this article, please read the quick and easy guide below:
- Download the required 3D printing design files
- Produce the required parts with the 3D printer
- Attach the terminals to the parts and connect them with power wires
- Assemble all parts to form the battery adapter
- Test the function of 3D printed battery adapter
Want to learn more about how you can use the Milwaukee M12 battery in Makita CXT tool? I'm gonna show you here today the solution, please continue reading below!
Maybe you own a Milwaukee M12 battery and Makita CXT drill, but for some reason, sometimes you have to leave your Makita CXT drill unused because you don't have a Makita CXT battery. Faced with this situation, you may need to design your own battery adapter to make your Milwaukee M12 battery and Makita CXT battery interchangeable. In this article, I will tell you in detail how to design the Milwaukee M12 battery to Makita CXT tool adapter, mastering this method, by creating a universal tool battery system, you can save yourself hundreds of dollars from investing in batteries and chargers from different brands and consolidate your tool batteries!
List of Preparations for Building 3D Printed Cordless Drill Battery Adapter for Milwaukee M12 to Makita CXT
Let's start now, to do this, you will need a 3D printer, the appropriate electrical contacts, and some wire at minimum. Here are available design files made by doublec4 on Thingiverse, you can click here to find them, so you don't have to design it yourself if you are looking for a Milwaukee M12 to Makita CXT adapter.
For this particular Milwaukee M12 battery to Makita CXT tool adapter, you will also need the following parts:
- M2x10mm Socket Head Cap Screws
- M2 Washers (7mm OD)
- M2 Nyloc Nuts
- The battery contacts on the Makita adapter
- The battery contacts on the Milwaukee adapter
- The regular insulated #6 ring terminals
- The 16AWG wire
- The 10K 1/2W resistor
Steps to Build 3D Printed Milwaukee M12 Battery Adapter
The following are the specific steps to build this adapter for Milwaukee M12 Battery to Makita CXT Tool:
Step1: Produce 3D Printed Battery Adapter Parts
The easiest way to make this battery adapter is to use 3D printer and just print it. If you don't personally have a 3d printer, maybe a friend a colleague or even your place of work has one where. For those who have the possibility to use the 3D printer, here is a link, where you could download project files: https://www.thingiverse.com/thing:4239972
You will need to use the 3D printer to create four parts according to the design files provided, which will have the following file names: tab.STL, MakitaInsert.STL, Makita_to_Milwaukee_Adapter.STL, M12Base.STL

Step2: Testing the Fit of 3D Printed Battery Adapter Parts
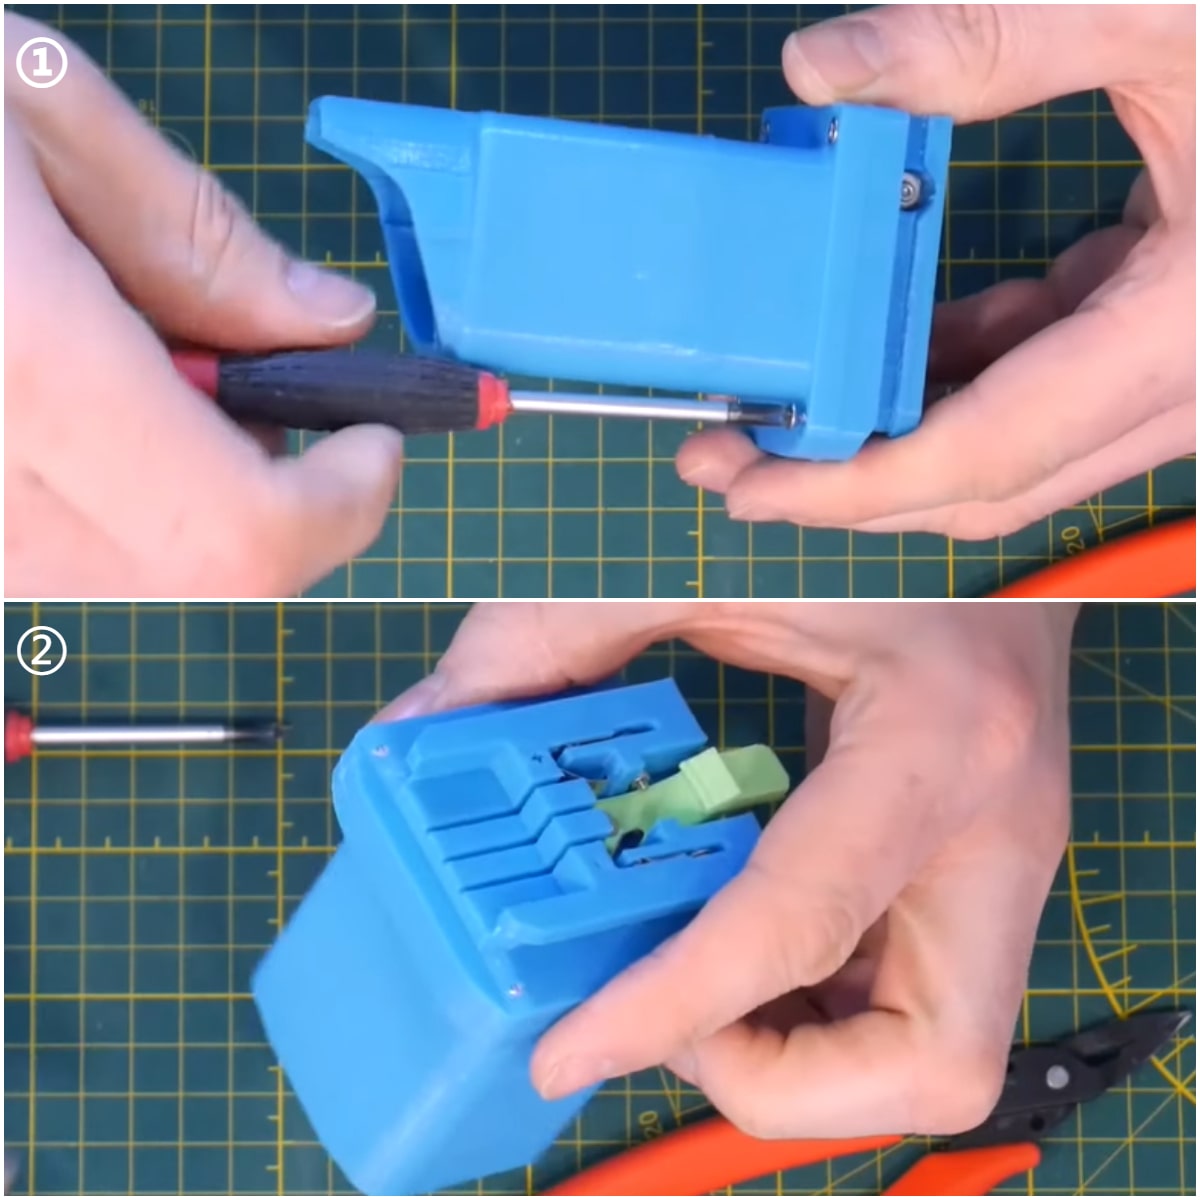
With a little locking tab (the part named tab.STL), we're gonna test fit that into the bottom of the Makita tool (the part named MakitaInsert.STL), you can see that it slides and locks into place, so we've done this successfully. Besides, if the other parts also fit correctly, we can proceed to the next step.

Step3: Install and Connect Terminals
1. Install the small spring terminals to the part named MakitaInsert.STL
First, you need to gently press the small spring terminals into the designated slots in the part named MakitaInsert.STL. Then, when you turn the adapter on its side, you will notice a hole in the model that aligns with a hole in the small spring connector. We will be using M2 hardware to securely fasten them in place.

2. Install the right-angle blade connectors to the part named M12Base.STL
At the top of the part named M12Base.STL, there are recesses that are designed to accommodate right-angled blade connectors. These blade connectors can easily fit into the designated slotted holes, securing them in place. Once inserted, the blade connectors establish the electrical connection to the Milwaukee battery.

3. Install the ring terminals to the top side of the part named M12Base.STL
On the top side of the model named M12Base.STL, there are some holes that can accommodate additional M2 socket head cap screws, of the same length (10 millimeters) as the ones we used on the Makita side. For the connection, we will utilize jumper cables with number 6 ring terminals crimped to the ends. I have already crimped the ring terminal jumpers. Initially, we will make these connections on the back of the Milwaukee adapter, using the number 6 ring terminals. We will be using an M2 by 10 socket head cap screw to attach these ring terminals. To secure them, we will use a nylock nut.

Next, we will begin by using our M2 socket head cap screw. We will flip over to the receptacle side of the battery. You will notice a small channel with a hole at the end, and that's where this bolt will slide into. Using our tool, let's tighten it into that hole until it reaches the desired position. Then, we will guide it through the hole and the blade connector. It should fit snugly, ensuring it stays in place while we work on the topside.
4. Assemble the part named Makita_to_Milwaukee_Adapter.STL and the part named M12Base.STL into a whole
Next, place the washer followed by the nylon locking nut. On the top side, you can use small pliers or a similar tool to hold the nut while making connections to the Makita side of the adapter. There is an intermediate part named Makita_to_Milwaukee_Adapter.STL through which we need to pass the ring terminals. After that, we will secure this piece to the Milwaukee side of the adapter using flathead self-tapping screws. These screws should be number four, with a length ranging from 3/8 inch to half an inch. You can observe them in position.

5. Connect the other end of the ring terminal to the spring terminal on the part named MakitaInsert.STL
Next, we can establish connections on the Makita side of the adapter, with the ring terminal sliding through the bottom hole. The ring terminal should be inserted through the bottom hole, aligning it with the hole in the battery contact. Then, you can slide in the M2 socket head cap screw along with the washer. On the other side, use the nylon locknut and tighten it securely. This will ensure that the battery contact is properly retained with the electrical connections completed.

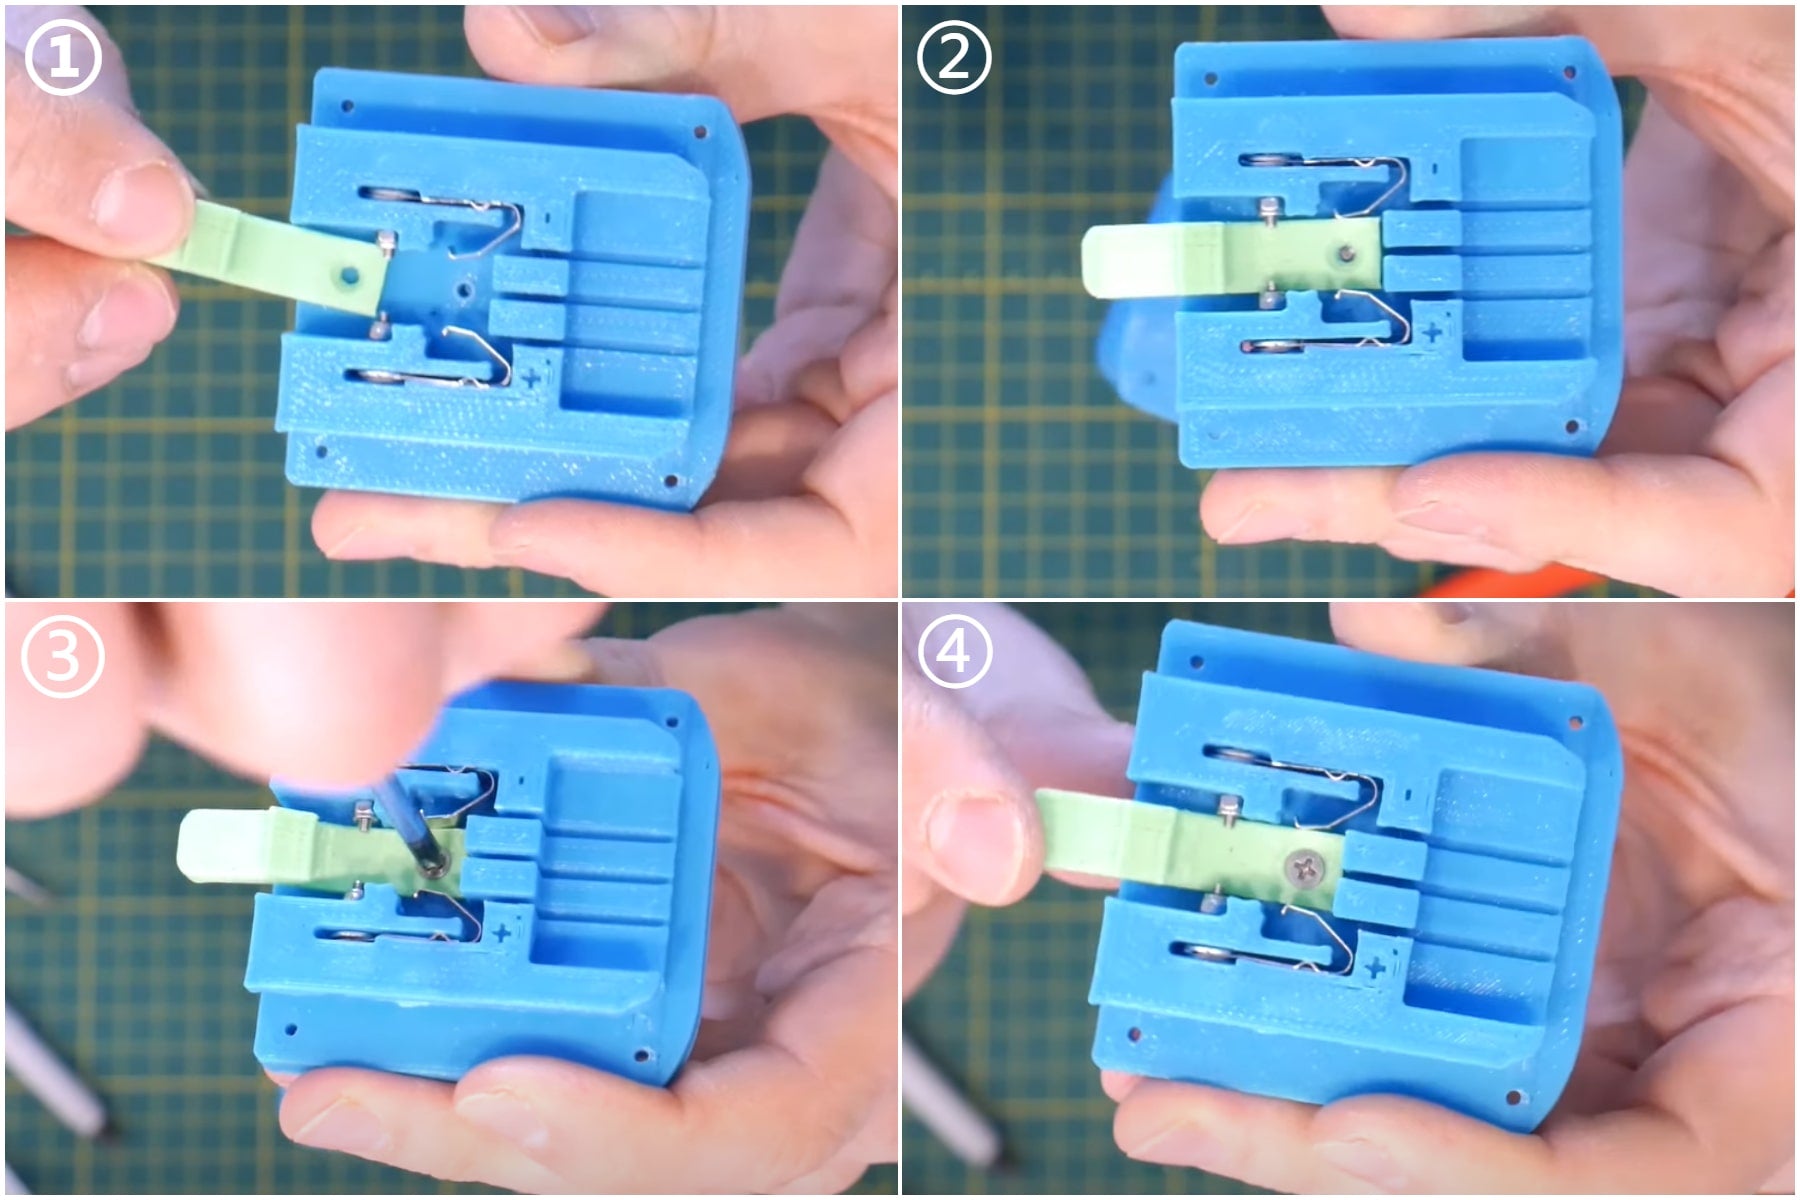
6. Install & secure the locking tab named tab.STL
Now, take the green locking tab and place it into position. This locking tab functions similarly to the ones found on regular Makita batteries, preventing the battery adapter from accidentally falling out of the receptacle. You can secure it in place with another flathead screw, specifically a number four self-tapping screw, which is only a quarter inch long.
Step4: Assemble All Parts
Now, finally, we can gather all our pieces and carefully tuck the wires into their designated positions. Let's grab another set of self-tapping screws. These screws, once again number fours, are half an inch long. We will need four of them. These screws will effectively sandwich all the pieces together, providing a secure and rigid hold. Once this step is completed, we can proceed to test our connection with the Makita tool itself. You will notice a nice and snug fit in the battery receptacle, and the locking tab should engage, preventing any accidental detachment. On the other end, we can insert our Milwaukee M12 battery, which should easily snap into place.
Step5: Test the Function of the Battery Adapter
Now you might be thinking, "Great! We're done. Let's fire up this tool!" However, here's where we were mistaken, at least for this Makita tool and many other tool manufacturers who monitor the battery temperature to prevent damage. This is where an interesting trick comes into play. If you take a look at the bottom of the Makita battery receptacle, you'll notice three connectors: a positive terminal, a negative terminal, and a middle connector. That middle terminal serves as a temperature terminal. Tool manufacturers monitor battery temperature using a component called a thermistor, which is essentially a specialized resistor that changes its resistance based on temperature. To simulate this behavior, I have taken a regular resistor and soldered it between the temperature pin (yellow wire) and the negative terminal (black wire). The resistor I used is a 10k resistor, which replicates the resistance of the thermistor at room temperature (25 degrees Celsius). I determined the value of the resistor by conducting some research online, where I found a website that sells Makita replacement parts. Among those parts, there is a thermistor listed with a value of 10k. Essentially, what we are doing here is tricking the tool into thinking that the battery pack's temperature remains constant at 25 degrees Celsius.

For those who have been paying close attention, you might be wondering why I didn't simply connect the temperature terminal on the Milwaukee battery to the temperature terminal on the Makita tool. The reason for this is that different manufacturers often use different values for their thermistors. Through further research, I discovered that the Milwaukee replacement thermistors have a value of 6.8k, which is significantly lower than the value required for the Makita tool. Using a thermistor with such a low value could cause the Makita tool to not function properly. Now that I have reassembled the tool handle, we are finally ready to test everything out. We can insert the adapter we created, lock it into place on the tool, slide in our Milwaukee M12 battery into the adapter, and then proceed to power up the tool. As expected, it should run smoothly, just like it would with a Makita battery installed. That's it!
Important Tips
The above content is from youtube blogger Chris Chimienti, you can click on the video below to watch each step, this tutorial is really very detailed and easy to follow.
Across the board, there are many similarities among different tool manufacturers, despite their varied claims in advertisements. In essence, they all incorporate a temperature sensor inside the battery to prevent overheating. If you decide to perform a modification like the video demonstrated, there are two crucial factors to consider:
- It is essential to maintain the same voltage to avoid damaging the motor by using a higher-voltage battery.
- If you bypass the thermistor with the resistor modification I showed you, please bear in mind that these tools should not be operated continuously throughout the day. If you are a professional tradesperson or someone who uses these tools extensively on a 24/7 job, running the modified setup for prolonged periods could lead to battery pack damage and, in extreme cases, even an explosion, given that lithium-ion batteries are involved.
If you're more of a hobbyist who frequently uses these things, the risk is very low because you're unlikely to overheat that battery pack. So, keep those things in mind, stay safe, and I hope this inspires you guys to build one of your own cordless tool battery systems.
Conclusion
This is all about how to design 3D printed battery adapter, and with this solution, you will be able to interchange batteries between brands or even within the same brand you can make your legacy batteries work with your new tools. It's usually pretty simple so why don't you just follow :)
If you like this guide, please bookmark and repost it, and if you have any questions or comments, please use the comment section down below, I do my best to get back to everyone!
However, if you think the above workload is too much and you don't have much time to complete it, you may consider just buying an adapter, you can check out the most comprehensive cordless power tool battery adapter buying guide to find what you need! If you don't find the adapter you need in this buying guide, please contact us via email and we'll be happy to serve you!
You can also read more guides about cordless power tool battery adapters:
- Cordless Power Tool Battery Adapter Buying Guide
- How to Use Any Brand Battery With Any Power Tool
- How to Use New Makita Batteries on Old Makita Tools
- How to Adapt Makita Batteries to Other Tools
- Bocsh Battery PBA Vs. GBA
FAQs about Designing 3D Printed Adapters for Cordless Power Tool Batteries
1. What would happen if you simply detach that third wire?
If you detach the temperature wire the tool won't run in most cases (if it monitors temperature).
2. Wouldn't it be better to incorporate the thermistor hack into the adapter?
The thermistor's purpose is to monitor the battery temp... if you put a thermistor inside of the adapter you are not monitoring anything (since it's not hooked up to the battery). There really isn't a purpose of using a thermistor as it won't be changing temperature and therefore won't be changing resistance. A simple resistor on the tool or adapter side is all you can do unless you can somehow connect to the adapted battery's temp pin and then map the battery thermistor's output to what the tool is expecting to see.
3. Why not just buy a battery adapter from the market?
Sometimes the fun is in doing it yourself... and someone has to design them... if everyone just waited for someone else to do it where would we be?


1 thought on “How to Build a Power Tool Battery Adapter: Milwaukee M12 to Makita CXT Battery Adapter”
Michelle
Need to convert a milwaukee battery to fit JCB 20v